Thursday, December 22, 2016

How to install a zipper in a pillow with piping.

There are quite a few tutorials out there on how to install a zipper in a piped pillow.  Trust me, I've tried most all of them.  And after many trial and error approaches (mostly error) using these methods, I've come up with a hybrid way of using bits and pieces from some of these and incorporating them with my own ideas.  I thought I'd share my way with you.

If this way doesn't work for you, keep looking and trying until you do.  It's really about patience and practice.  I'll even give you my tried and true way of matching patterns.

I'm assuming you know how to sew a basic pillow with a zipper.  There are plenty of tutorials out there if not.  I'm only going to show you the basics for installing a zip when there is piping involved.

The first thing to do is press one side of the invisible zipper flat. At this point, you should already have your piping attached to the pillow front or back.


I like using a piping or welting foot on my machine.  They aren't terribly expensive and well worth their weight in gold if you do a lot of piping.  I have already serged the edges of each pillow section where the zipper will go.


Then I measure in 2-3" from each edge (depending on the pillow size) and mark my zipper placement.  This is where I will start and stop stitching.  This is done on both pillow pieces.


Next, line up the piping under your piping foot just like you did when you attached it.  Take the flat zipper (the side you pressed flat) and put that under your piping foot and on top of your pillow edge right side down.  The zipper teeth should be right on the edge of the piping and inside the groove of the piping foot.  See where my skewer is pointing?  My needle position is centered.  I don't touch it.


I use a skewer to gently keep the zipper in place as I stitch pressing slightly in that groove of the piping.


This is what it will look like when you have that side complete.

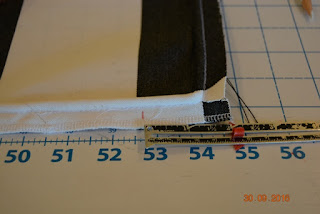
Now the zipper is closed and marks are placed where you stopped and started stitching on the first side.  I should have gotten a close up here.  If you'll look where the #38 is on my cutting mat, you can just make out my red mark.


In order to line up the stripes, marks will also be placed on the other side of the zipper at each stripe. There are two red marks side by side in this picture.  One is my stripe mark, and the other is where the stitching started.


Place the other pillow piece on top right sides facing.

I love wonder tape!  It's one staple I will never be without in my sewing room.  It makes these projects so easy.  It's my secret weapon.

Place a piece of wonder tape on the pillow piece from one mark to the other (these are marks for the zipper placement).  This is one side.


Yellow arrow is where the wonder tape is placed.  The fabric is folded back on itself.  Peel off the paper backing on the wonder tape.


Unzip the zipper and lay it on top of the wonder tape matching the start/stop marks and the stripe line marks.  No pinning and no shifting.  That zipper will stay put.  Stitch that puppy on!  I switch to my invisible zipper foot for this step.  You could always press this side flat and use a regular zipper foot.


And it should look like this. Look at those perfectly aligned stripes!!  Sorry for my messy work area. I was making 6 of these when I did the tute!


The other secret here is to stitch the opposite side next, then stitch the sides.  Get out your wonder tape and put it on the side without piping.  And place the two right sides together.  If you are brave, just put the two sides together and pin at each stripe checking both front and back to make sure the pin hits the stripe on each at the stitch line.  I recommend using the wonder tape until you've done a few.  Just be sure to match your stripes whatever method you choose.  I do it this way so if I have a mistake or my stripe placement is off, it's easier to rip out.


If using pins, you should have one at every stripe.  Stitch.


Now you have a big pillow tube!


Now simply stitch the two sides (remember to open the zipper) and that's it!  Marvel at your newly stitched, perfectly aligned striped, piped pillow.  Say that fast 3 times!!


I hope this method works for you.  Please feel free to ask questions if I haven't made something clear.

Thanks for stopping by!
Angela

Tuesday, December 20, 2016

Children's Corner Mary De

I have been busy in my workroom and have had very little time to post.  I think I'm nearly caught up now, so I thought I'd show you a few things I've accomplished over the last few weeks.

This is a Children's Corner Mary De.  This pattern is one of my favorites.


I loved this print fabric but didn't have enough for the entire dress, so I added a black band along the bottom and trimmed it with ric rac.  I also used a smocked insert.

The smocking plate is from Ellen McCarn -  It's called Ladybug Family

This is the first time I've smocked into the arm holes on the Mary De.  It was a bear.  All the bulk made it impossible to turn that seam allowance to the inside.  So I chose to put a bias binding around those edges instead.  I like it. Just remember to cut away the seam allowance if you do this.  This is also the first time I've done double piping.


This has to be the best collar I've ever done.  I used Gail Doane's method of adding the piping and cutting it out.  I've never done it before and it took me two tries, but I love it!  I'll always use this method.

I had these sweet little ladybug buttons for the back closure.


I added little ladybug buttons to the sleeves.

And of course she had to have matching socks.  Laurie at Southern Stitches has a great tutorial for these.


Monday, October 31, 2016

Newlook 6859 - Pattern Review

This is my go to pattern for PJ pants.  I've used it many times, and I never get bored.

I made these two for my son for Christmas.  I made the large and he typicallys wears an XL.

I found the bird fabric at Joann's and thought it would make perfect PJ's.  The green cotton I had in my stash.


I used 1" wide elastic for this pattern rather than the called for 1/2".  1/2" is just too small for grown ups in my opinion.  I didn't adjust the pattern to accommodate the size increase, since most of the recipients like the pants to sit lower anyway.  I serged the top edge and folded it over 1 1/4".  I also ran a length of twill tape through the button openings rather than a faux ribbon.  I wasn't sure about the exact waist measurement, so I erred on the large side knowing they could cinch them with the twill tape to make them smaller.  You can just see the twill tape here.


This pattern is unisex, so it works for women too.  I made this pair for my husband's Aunt. I made the extra small in these.

This time I used some ribbon I had on hand rather than twill tape running it along the inside with the elastic - same as before.  I used 1" elastic on this pair too.


I added lace to the bottom of the legs.  I wanted these very feminine.


Pattern Description: Misses' Men's & Teens' Separates

Pattern Sizing: XS - XL - I made a Large.  This pattern runs Large! 


Did it look like the photo/drawing on the pattern envelope once you were done sewing with it? Yes.

Were the instructions easy to follow? Yes; although I used my own order of construction.

1. Stitch the button holes.
2. Stitch the inner leg seams.
3. Stitch the pockets. This will differ slightly depending on which pocket you choose.
4. Serge the pant leg and turn up the hem and press.  This aids in stitching the hem later.
5. Stitch the side seams.
6. Stitch the pant leg hems.
7. Serge each top edge of the pants.  And turn down the 1 1/4" allowance for the casing and press.  This aids in that turn down later.
8. Stitch the crotch seam by putting one pant leg inside the other.
9. Stitch the top casing.

What did you particularly like or dislike about the pattern? I love that this is a versatile pattern for both men and women.

Fabric Used: cotton 


Pattern alterations or any design changes you made:  I used 1" elastic rather than the 1/2" the pattern called for.  1/2" is just too small for adults in my opinion.  I also ran twill tape and ribbon along side the elastic to account for variation in waist size. 

Would you sew it again? Would you recommend it to others? Yes, I think it's a great pattern.

Conclusion: This is one of my favorite patterns.  I've used it many times and will continue to use it.


Please feel free to leave comments or ask questions.  I welcome your feedback.

Thanks for stopping by!
Angela

Thursday, October 6, 2016

Children's Corner Casey Coat

I love this pattern.  It was super easy with only 4 pattern pieces, front, back, sleeve and hood.  The instructions were also very easy to follow.

I chose this pink toile pique for the focus fabric and a pink cotton gingham for the lining.

I also decided to trim the hood and the sleeves with ric rac.


I chose to use a larger size covered button than the pattern called for so I could monogram the letters to spell out her name.

Here is a close up of the L.

I love how this turned out.  Just a side note.  This pattern runs really large.  I made the size one which is equal to an 18 mos, and it swallowed Lila who wears an 18 mos.  This is more like a size 2.  But it will be very room for layers and she'll get longer wear.

Thanks for stopping by.  Feel free to leave questions or comments below.

Angela


Thursday, August 25, 2016

Baby Gifts

I have had to do lots of sewing lately for a couple of new arrivals.  One is a baby girl that one of my oldest and dearest friends is adopting.


The blanket is reversible with a quilting cotton (dots) on one side and flannel (owls) on the other.


The blanket is my own creation.  The contoured reversible burp cloths are from a tutorial I found on Pinterest and you can find it here.


The changing pad is one I've done before.  It's a Bernina pattern. You can find that tutorial here.  I used the same quilting cotton as in the blanket and a chanille fabric for the inside. I like these because it will hold a small container of wipes and a couple of diapers.  I found the plastic wipe container at our local dollar store.

I found the ribbon and a tutorial on the pacifier clip at The Ribbon Retreat, but I kind of did my own thing with it.

These are just a few things I've made for our newest little girl.  I have several other projects in the works.

And for our newest boy:

Again the blanket is reversible with quilting cotton (triangles) and flannel (dots).  The navy fabric is so cute for a boy, don't you think?


Here is the same changing pad.

The burps are two different styles, because I ran out of the triangle fabric and had to do some smaller ones.  There is one large contoured and two smaller double contoured.  You can find that tute here.

And there you have it.  I've have been a bit busy lately with baby sewing and loving every minute!

I have a few custom orders to get through before I can get back to baby sewing. I have several things on deck for Miss Lila.

Thanks for stopping by.

Please feel free to ask questions or post comments below.
Angela

Monday, August 22, 2016

Creations by Michie' Bubble pattern #142


This sweet baby girl turned 1 Saturday and she had to have a birthday bubble.  So her surrogate Mimi went to work.

I love bubbles on little girls and thought this pattern would be perfect.  I used ric rac to adorn the angel sleeve version.  I made the 18 mos, because there wasn't a lot of difference in overall width from the 12 to 18.  I thought she could use the extra length and make it last longer than a season.

The smocking plate is "Happy Birthday" by Ellen McCarn.  There were three candles on the cake in the pattern, but I used only one. I had to omit some rows to make it work for this little bishop.


The colors are so bright and cheerful, don't you think?

I'd definitely make this bubble again.  It was really easy to put together.  I used Martha's seamless pleating method and liked it a lot.  I need more practice but it will become my new favorite method to pleat.

Feel free to leave comments or ask questions below.

Thanks for stopping by.
Angela

Friday, August 19, 2016

Gym Bag - Craftsy Class


If you haven't tried a class on the Craftsy platform, I encourage you to try one.  They have some really good ones, and this one is no exception.  It's Sew Better Bags: The Weekend Duffle by Betz White.  Betz has a wonderful teaching style.

There are two sizes of bags in the class, and I chose the larger.  I have so much gym stuff and need the extra room when I pack a change of clothes and shoes.  A pair of boots would also fit in this bag when fall arrives.


On the outside, there are two pockets.  You have a choice of a bellow style or pleated style.  I chose the latter.  There is also an option for magnetic snap closure or a twist lock.  I wanted something easy so chose the magnetic snaps.  It didn't hurt that I already had them on hand.  :)  The pockets are large enough to hold my work out gloves in one and my cell phone and keys in the other.


Here it is closed.  That little blue pouch hold my ear buds.  I'll eventually make one to match the bag.  I should have just enough fabric left over.


The inside has one zippered pocket.  I keep small items in here - safety pin, money, hygiene products, etc.


I had this really large zipper on hand too.


All the other hardware came from The Ohio Travel Bag Company.


I really like the padded handles too.  They are wide enough that I can sling it over my shoulder without using the shoulder strap and the padding is comfy on my shoulder.


The only thing I did differently than Betz was to set the lining in.  I learned it this way on another Amy Butler bag I made a while ago and liked it better.

The only thing I would do differently next time is shorten the shoulder strap.  It is way too long for me at 5'4".  I would also add an end pocket to hold my water bottle.  Other than that, it has just enough pockets for all my stuff and plenty of room for just about anything else I could throw in.

Thanks for stopping by.  Feel free to post comments or ask questions below.

Angela