If this way doesn't work for you, keep looking and trying until you do. It's really about patience and practice. I'll even give you my tried and true way of matching patterns.
I'm assuming you know how to sew a basic pillow with a zipper. There are plenty of tutorials out there if not. I'm only going to show you the basics for installing a zip when there is piping involved.
The first thing to do is press one side of the invisible zipper flat. At this point, you should already have your piping attached to the pillow front or back.
I like using a piping or welting foot on my machine. They aren't terribly expensive and well worth their weight in gold if you do a lot of piping. I have already serged the edges of each pillow section where the zipper will go.
Then I measure in 2-3" from each edge (depending on the pillow size) and mark my zipper placement. This is where I will start and stop stitching. This is done on both pillow pieces.
Next, line up the piping under your piping foot just like you did when you attached it. Take the flat zipper (the side you pressed flat) and put that under your piping foot and on top of your pillow edge right side down. The zipper teeth should be right on the edge of the piping and inside the groove of the piping foot. See where my skewer is pointing? My needle position is centered. I don't touch it.
I use a skewer to gently keep the zipper in place as I stitch pressing slightly in that groove of the piping.
This is what it will look like when you have that side complete.
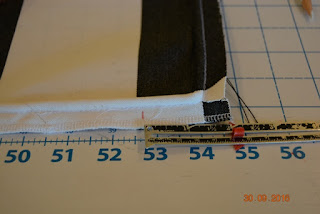
Now the zipper is closed and marks are placed where you stopped and started stitching on the first side. I should have gotten a close up here. If you'll look where the #38 is on my cutting mat, you can just make out my red mark.
In order to line up the stripes, marks will also be placed on the other side of the zipper at each stripe. There are two red marks side by side in this picture. One is my stripe mark, and the other is where the stitching started.
Place a piece of wonder tape on the pillow piece from one mark to the other (these are marks for the zipper placement). This is one side.
Yellow arrow is where the wonder tape is placed. The fabric is folded back on itself. Peel off the paper backing on the wonder tape.
Unzip the zipper and lay it on top of the wonder tape matching the start/stop marks and the stripe line marks. No pinning and no shifting. That zipper will stay put. Stitch that puppy on! I switch to my invisible zipper foot for this step. You could always press this side flat and use a regular zipper foot.
And it should look like this. Look at those perfectly aligned stripes!! Sorry for my messy work area. I was making 6 of these when I did the tute!
The other secret here is to stitch the opposite side next, then stitch the sides. Get out your wonder tape and put it on the side without piping. And place the two right sides together. If you are brave, just put the two sides together and pin at each stripe checking both front and back to make sure the pin hits the stripe on each at the stitch line. I recommend using the wonder tape until you've done a few. Just be sure to match your stripes whatever method you choose. I do it this way so if I have a mistake or my stripe placement is off, it's easier to rip out.
Now you have a big pillow tube!
I hope this method works for you. Please feel free to ask questions if I haven't made something clear.
Thanks for stopping by!
Angela


Excellent tutorial, Angela. Love those stripes.
ReplyDeleteThank you Bunny! I love this fabric too.
ReplyDelete