Monday, March 28, 2016

Lila's Easter Dress - Modeled

A modeled picture is soooo much better than just the dress.  She is so, so sweet in her Easter dress, but she looks adorable no matter what she wears.  The tatted headband is a bookmark pattern I had.  I weaved a ribbon through the center and attached elastic on the underside.  It was not my best work, so no close up! lol


And here is mom and dad with us at church this weekend.  No wonder she is so darn cute!  Look at her parents!!


I hope all of you had a wonderfully blessed Easter with family and friends.

Thanks for stopping by.
Angela

Friday, March 18, 2016

Lila's Easter Dress

I know these are a bit dark, but our we had rainy weather and I couldn't get this outside for a really good picture.

This is an Ellen McCarn Bishop dress with a Pat Garrison smocking plate.  I've used the dress pattern many times but this is a first on the smocking plate.  Both were very easy.

This dress was very long, so I added 4 growth tucks at the hem to be let out as little bit gets older/bigger/taller.


I am very out of practice on my picture smocking but hopefully we are going to rectify that little problem, since I have so many more ideas swirling around in my head. LOL


I also smocked some matching socks but totally forgot to get pics.  You can find a tutorial on that here.  They really are super simple to do and I suspect I'll be doing many more.  :)

Thanks for stopping by, and I hope to get some modeled pics on Easter to share with you.  Lila looks adorable in her Easter dress.  She'd look cute in anything!

Glad you stopped by.  Feel free to leave comments or questions below.

Enjoy the weekend!


Tuesday, March 15, 2016

Pillow Case Dress


This is another little creation for baby Lila.  It's still a bit big on her but it should serve her well through the summer and perhaps into next year too.  I had planned some bloomers but I have set those aside for now.  Sewing gremlins arrived in my sewing room as I started work on those.

I love the big bows on the backs of these dresses.  I saw a tutorial on one where the placket was cut into the dress.  I thought that was sort of unnecessary since there is a seam already.  I just turned the seam to the back and used it for the placket.  I'll make another soon with some fabric I picked up yesterday and do a quick tute.

I like the larger tie to keep them from falling off her shoulders.


I really wanted to applique a bunny on the front.  But the bunny wasn't cooperating.  Besides it would kind of limit to Spring wearing.  I opted instead for these parasols that were on the Children's Corner website.  I had pinned them some time ago and thought they would be perfect.  These are much, much smaller than called for, but the dress is so small.  Because they were so small, I wasn't able to stitch the other two lines required.  It just looked wonky.


I hope I'll get around to the bloomers at some point before next year so she'll have at least another year to wear it.

Thanks for stopping by.  Feel free to ask questions or post comments.

Happy Tuesday!
Angela

Wednesday, March 9, 2016

Baby Polly by Pintucks and Petticoats

This will become one of my favorite patterns.  It is really versatile and so easy to make.  I first saw this pattern in a SB issue many years ago and I believed it was used for a night gown, so I bought the pattern and it has laid in wait ever since.  Then I saw it again in SB July/August 2011 issue using smocking and tucks and knew I had to attempt it.  I did and failed miserably!!  So I opted instead for simple tucks and embroidery.

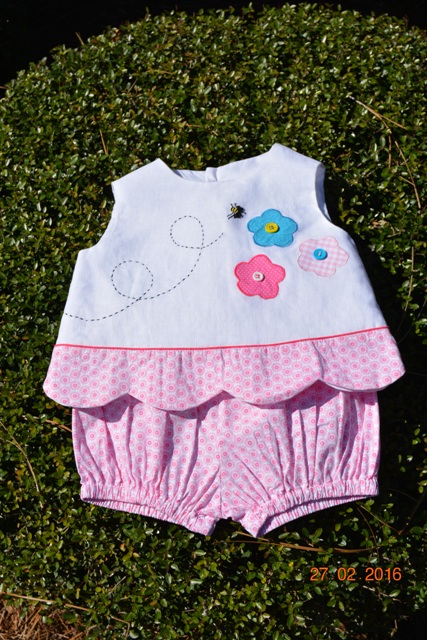
The tucks are 1/4" with space between each set of 3.  I then machine feather stitched in the open spaces.  I had this really pretty cotton lace edging and thought it would be pretty along the bottom and around the armscyes.


As my bad luck would have it, I also attempted horizontal tucks along the bottom.  And when I ripped those out, I managed to also rip a hole in the top.  It was an awful lot of work to scrap it.  I used interfacing on the wrong side of the hole, then stitched ribbon across the right side bottom to cover it.  Whew!!  I then hand embroidered an old fashioned feather stitch in between since the ribbon just seemed out of place on its own.


I was going to make the bloomers just as directed in the pattern BUT I didn't have 1/8" wide elastic and 1/4" was way too big.  I decided to try several tucks at both leg openings and decided I didn't like those.  So I opted for a large inverted pleat which then got ribbon ties on either side followed by some machine feather stitching to keep the folds in place.  I also trimmed the legs with the same cotton lace.

I must say I am having so much fun sewing for the new little girl who has graced our lives.  Mommy has also been very gracious to allow me to make little Lila an Easter dress.  So I have a smocked bishop in the works.  But I couldn't stop there.  I also have a pillow case dress awaiting an applique and ruffled butt bloomers.

I seriously think I have an addiction a problem.  And since I've ordered more fabric, I don't see it ending anytime soon.  It is so much fun sewing for a little girl again!  And I get to be her adopted Mimi.  It's great practice for when my own daughter decides to find her unicorn and start having some babies of her own. In due time!!

Thanks for stopping by!!
Angela

Tuesday, March 1, 2016

Bonnie Blue Designs Marcy

This is one of the easiest patterns I've done.  It was quick, easy to understand, and it turned out so cute.  This is not, however, a pattern for a newbie.  The instructions were good.  Don't get me wrong.  But you have to know things like how to apply piping, because while they give great instructions on how to make piping, it lacks actual instruction on how/where to apply it to the garment.

Also, the pattern calls for installing the elastic before doing the appliqued flowers on the panties.  Take my advice and do it before.  It's hard, especially on the smaller sizes, to get the fabric to lay flat under the machine.  That's why my flowers are up higher than I would have liked.


It button down the back, and I loved the button placement guide.  I rarely find one that I like in patterns.

The scalloped hem was super easy.  It's the first I've done I believe.  The pattern has 2 views, one like this with the coordinating color scallops.  And one that is all one color.

I will definitely make this pattern again.  I think so many things could be done with it.

Thanks for stopping by!  Please feel free to ask questions or post comments.

Angela